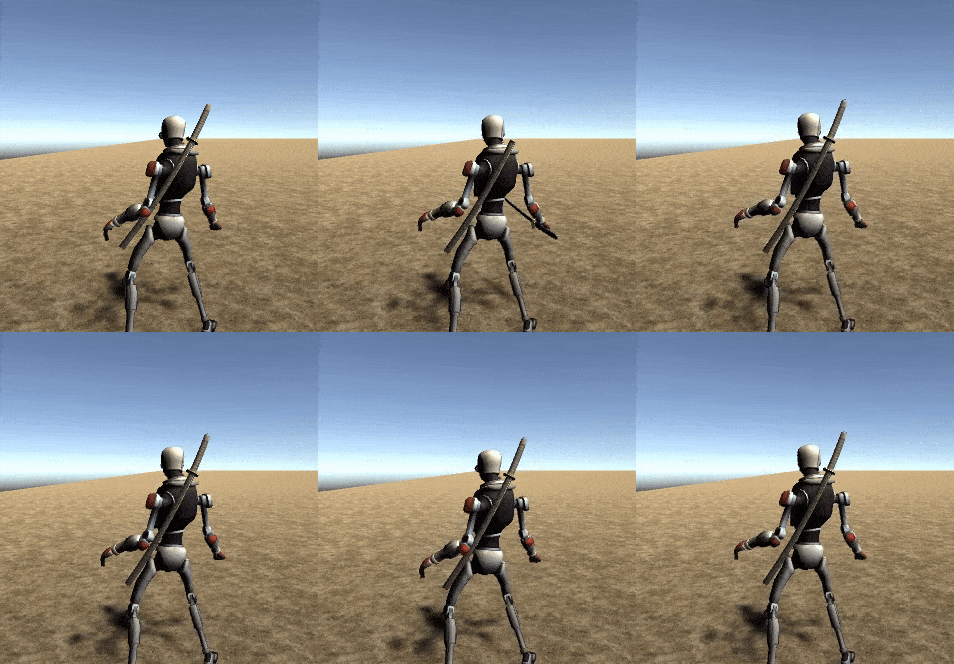
【Unity】キャラクターに抜刀させる方法
概要
Unityでキャラクターにアニメーションをつけて剣を抜刀する方法について紹介していきます。
完成イメージ
このように背中につけた刀を鞘から抜き、また元に戻すまでを作ります。

Step1 : 必要Assetの準備
刀の入手
まずは肝心の刀のオブジェクトをUnityAssetからダウンロードします。どんなものでもいいですが、剣と鞘がセットになっているオブジェクトが使いやすいと思います。今回は以下のアセットを使用することにします。
https://assetstore.unity.com/packages/3d/props/weapons/free-katana-and-scabbard-67185
ダウンロードしてUnityへインポートしておきます。
抜刀アニメーションの入手
抜刀するためのAnimationはいつもお世話になっているMixamoから取得することにします。Fantasyシリーズから Draw A Great Sword 1というアニメーションを使用することにしました。これをダウンロードし、Unityへインポートします。
https://www.mixamo.com/#/?genres=Fantasy&page=1&type=Motion%2CMotionPack
Step2 : 抜刀させる方式
アニメーションの再生
アニメーションの再生にはSimpleAnimationを使用します。
SimpleAnimationの使い方についてはこちらで紹介していますので参考にしてください。
刀の移動
抜刀においては刀の移動方法が肝になると思います。今回は以下の流れで実現していきます。
- 刀の鞘をキャラクターの背中に配置しておく。
- 刀を鞘の子オブジェクトとして鞘の中に収めておく。
- 抜刀するためのボタンがおされたら抜刀アニメーションを再生する
- アニメーションの再生に合わせ刀を持ち手の子オブジェクトに付け替える
- 抜刀完了
刀を鞘へしまうときは上記の動きの逆になります。
Step3 : スクリプト
以下が上記を刀の移動を行うためのスクリプトです。
using System.Collections;
using System.Collections.Generic;
using UnityEngine;

public class Battou : MonoBehaviour
{
    // Start is called before the first frame update

    [SerializeField] public bool isActivatedWeapon = false;//抜刀完了フラグ
    [SerializeField] public bool isDeactivatedWeapon = true;//抜刀前フラグ
    [SerializeField] public bool inTranWeapon = false;//抜刀中フラグ

    //RigidBodyインスタンス定義
    Rigidbody rb;

    //SimpleAnimationインスタンス定義
    SimpleAnimation simpleAnimation;

    //刀オブジェクト格納用
    public GameObject weapon;
    public GameObject swordPod;
    public GameObject weaponOn;

    //刀の位置姿勢格納用ベクトル
    Vector3 weaponOnPos;
    Vector3 weaponOnRot;

    // Start is called before the first frame update
    void Start()
    {
        //Rigidbodyコンポーネントの取得
        rb = this.GetComponent<Rigidbody>();

        //キャラクターの回転抑止
        rb.constraints = RigidbodyConstraints.FreezeRotation;

        //シンプルアニメーションコンポーネントの取得
        simpleAnimation = GetComponent<SimpleAnimation>();

        //親オブジェクトの取得
        weaponOn = weapon.transform.parent.gameObject;

        //抜刀状態の位置を記憶しておく
        weaponOnPos = weapon.transform.localPosition;
        weaponOnRot = weapon.transform.localEulerAngles;

        //swordPod状態のときの親子関係に変更し、一旦鞘に納めた状態にする
        weapon.gameObject.transform.parent = swordPod.gameObject.transform;
        weapon.gameObject.transform.localPosition = Vector3.zero;
        weapon.gameObject.transform.localEulerAngles = Vector3.zero;

        //抜刀前フラグをtrueに
        isDeactivatedWeapon = true;
    }

    // Update is called once per frame
    void Update()
    {
        //抜刀ボタンが押されたとき
        if (Input.GetKey(KeyCode.A))
        {
            //抜刀前かつ抜刀アニメーション再生中ではないとき
            if (isDeactivatedWeapon && !inTranWeapon)
            {
                //抜刀アニメーションを開始
                simpleAnimation.CrossFade("SetWeapon", 0.1f);

                //アニメーション中フラグをONに
                inTranWeapon = true;

                //コルーチンスタート
                StartCoroutine("inTranWeaponReset");

            }
            //抜刀完了かつ抜刀アニメーション再生中ではないとき
            else if (isActivatedWeapon && !inTranWeapon)
            {
                //鞘に納めるアニメーション開始
                simpleAnimation.CrossFade("SetWeapon", 0.1f);

                //アニメーション中フラグをONに
                inTranWeapon = true;

                //コルーチンスタート
                StartCoroutine("inTranWeaponReset");
            }
        }

        //アニメーション再生中ではない時
        if (!inTranWeapon)
        {
            //Idleアニメーションを再生
            simpleAnimation.CrossFade("WeaponIdle", 0.1f);
        }
    }
    private IEnumerator inTranWeaponReset()
    {
        //0.3秒待機(アニメーションのちょうどいいタイミングで刀の親子関係を付け替えるため)
        yield return new WaitForSeconds(0.3f);

        //抜刀前のとき
        if (isDeactivatedWeapon)
        {
            //刀を持ち手の子オブジェクトへ変更
            weapon.gameObject.transform.parent = weaponOn.gameObject.transform;

            //オブジェクトを抜刀状態のポジションへ移動
            weapon.gameObject.transform.localPosition = weaponOnPos;
            weapon.gameObject.transform.localEulerAngles = weaponOnRot;
            isActivatedWeapon = true; //抜刀中フラグをtrueに
            isDeactivatedWeapon = false; //抜刀前フラグをfalseに
        }
        //抜刀後のとき
        else if (isActivatedWeapon)
        {
            //刀を鞘の子オブジェクトへ変更
            weapon.gameObject.transform.parent = swordPod.gameObject.transform;

            //オブジェクトを抜刀前状態のポジションへ移動
            weapon.gameObject.transform.localPosition = Vector3.zero;
            weapon.gameObject.transform.localEulerAngles = Vector3.zero;
            isActivatedWeapon = false; //抜刀中フラグをtrueに
            isDeactivatedWeapon = true; //抜刀前フラグをtrueに
        }
        //アニメーション再生フラグをfalseに
        inTranWeapon = false;
    }
}
特記事項としては以下になります。
- InspectorでRigidbodyを取り付けておく。
- InspectorのSimpleAnimationに必要なアニメーションを取り付けておく
- InspectorでWeapon、SwordPodにそれぞれ刀と鞘のオブジェクトを対応付けておく。
- 鞘の位置と刀の持ち手の位置姿勢はあらかじめsceneを見ながら調整しておく。
- 抜刀アニメーションが完了するまでidleにならないようにフラグを使用している(inTranWeapon)
- コルーチンを使用して刀の親子関係を鞘から持ち手に変えるタイミングを調整する。
以上
Unityを一から学ぶのにおすすめの本はコチラ
